When it comes to desserts, pavlovas have a special kind of magic. Light, crisp, and topped with colourful fruit, they manage to be both elegant and comforting at the same time. Despite being named after Russian ballerina Anna Pavlova, they actually come from either Australia or New Zealand (the debate still rages on!). Traditionally, pavlovas are made as one large showstopper, but I’ve fallen in love with their smaller cousins – individual fruit pavlovas.
Why? Well, for starters, they’re absolutely beautiful. Each little meringue nest is like a blank canvas, ready to be dressed up with whatever fruit is in season. They’re also incredibly versatile – perfect if you’re catering to different tastes, or just using up the odds and ends from your fruit bowl. And best of all, they’re already portioned out, so no awkward slicing or arguments over who got the bigger piece!
What Makes Them So Special
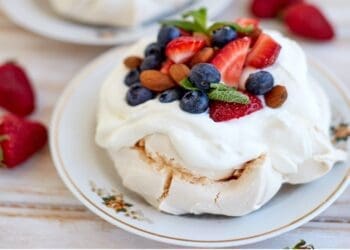
Imagine biting into a delicate meringue shell – crisp on the outside, soft and marshmallowy in the middle. On top, there’s a swirl of whipped cream or Greek yogurt, and a jewel-like mix of fresh fruit: strawberries, kiwi, mango, blueberries, raspberries – whatever takes your fancy. A drizzle of golden honey or glossy fruit coulis finishes it off, and maybe a little mint leaf for colour.
Individual Fruit Pavlovas are perfect for a fancy dinner party as they are for a relaxed Sunday afternoon tea. Simple enough for everyday baking, yet special enough to impress.
Making Your Own Individual Fruit Pavlovas
It all starts with the meringue. Whip up egg whites until they’re soft and foamy, then gradually add sugar until they’re glossy and hold stiff peaks. A little corn-starch, vinegar, and vanilla help with the texture and flavour. Spoon or pipe them onto a baking tray, making small nests with a slight dip in the middle.
Bake them low and slow so they dry out without browning too much. Once they’re done, leave them in the oven with the door slightly open to cool – this helps prevent cracks. Then comes the fun part: topping them! Load them with cream or yogurt, scatter over your chosen fruit, and add that all-important drizzle.
Tips for Perfect Individual Fruit Pavlovas
- Patience Pays Off – Don’t rush whipping your egg whites; this is what gives the pavlovas their lift.
- Gentle Folding – Mix in your extras carefully so you don’t knock out the air.
- Low and Slow – Keep the oven temperature low to get that crisp shell and soft centre.
- Get Creative – Try different fruits, flavoured creams, or even a dusting of cocoa powder for something different.
A Dessert Worth Celebrating
Individual fruit pavlovas aren’t just a sweet treat – they’re a celebration on a plate. Whether you’re sharing them with family, serving them to friends, or enjoying one all to yourself, each bite is a little burst of joy. Light, fresh, and endlessly adaptable, they’re proof that sometimes the simplest desserts are the most memorable.
So, next time you want to serve something beautiful and delicious, whip up a batch of these little meringue nests. They’re guaranteed to make any occasion feel just that bit more special.
Individual Fruit Pavlovas
Ingredients
For the Meringue:
- 4 large egg whites at room temperature
- 1 cup granulated sugar
- 1 tsp corn-starch
- 1 tsp white vinegar
- 1/2 tsp vanilla extract
For the Toppings:
- strawberries , kiwi, mango, blueberries, raspberries
- Whipped cream Greek yogurt
- Mint leaves for garnish
- Honey fruit coulis for drizzling
Instructions
- Preheat your oven to 250°F (120°C). Line a baking sheet with parchment paper.
- In a clean, dry mixing bowl, beat the egg whites on medium speed until soft peaks form.4 large egg whites
- Gradually add the sugar, one tablespoon at a time, while continuing to beat on high speed until the meringue is thick and glossy. This process should take about 8-10 minutes.1 cup granulated sugar
- Gently fold in the corn-starch, white vinegar, and vanilla extract until well combined.1 tsp corn-starch, 1 tsp white vinegar, 1/2 tsp vanilla extract
- Spoon or pipe the meringue onto the prepared baking sheet, forming individual pavlova nests. Create a slight indentation in the centre of each nest to hold the toppings.
- Bake the pavlovas in the preheated oven for 1 hour and 15 minutes, or until they are crisp on the outside and set. Turn off the oven and let the pavlovas cool completely with the oven door slightly ajar.
- Once cooled, carefully remove the pavlovas from the parchment paper and transfer them to a serving platter.
- Just before serving, top each pavlova with a dollop of whipped cream or Greek yogurt, an assortment of fresh fruits, a drizzle of honey or fruit coulis, and a garnish of mint leaves.strawberries, Whipped cream, Honey, Mint leaves
- Serve the individual fruit pavlovas immediately and enjoy the heavenly combination of crunchy meringue, creamy toppings, and juicy fruits.
26 comments
Totally stunn8ng and very tasty.
The honey drizzle ties it all together beautifully.
I loved how the pavlovas looked like little edible crowns filled with fruit. They tasted just as good as they looked—crunchy, fluffy, sweet, and tangy all at once.
A perfect balance of textures—crunchy meringue, soft whipped cream, and juicy fruit.
These were a hit with both adults and children at our barbecue.
I’ve made these for a dinner party, and they were the talk of the evening. The crunchy shell with a marshmallowy inside was perfect, and the fresh fruit made them look like jewels.
I especially loved the Greek yogurt option, which gave a lovely tang to cut through the sweetness.
I was nervous about making meringue, but these turned out perfect.
The meringue is crisp yet melts away in your mouth, and the combination of tangy kiwi, sweet mango, and tart raspberries is divine.
The pavlovas were perfectly crisp outside and soft inside. The drizzle of honey coulis gave a fragrant sweetness that paired beautifully with the tart raspberries.
These are light enough to enjoy after a big meal but still satisfy my sweet tooth.
These little pavlovas are pure elegance on a plate.
I love that each person gets their own pavlova—it feels personal and special.
The meringues held their shape perfectly, and the hint of vanilla in the base was heavenly.
The crunch-to-creamy ratio was spot on, and the fruit tasted even better with that sweet drizzle.
These pavlovas are a summer dream!
The kids loved choosing their own fruit toppings.
The whipped cream is indulgent, the fruit adds freshness, and the mint gives just the right amount of lift.
The mix of berries and tropical fruit made every bite different.
A brilliant make-ahead dessert! I baked the nests earlier in the day and assembled them just before serving.
The low baking temperature and slow cooling gave me flawless shells. My guests thought they were bakery-bought.
Absolutely stunning
The instructions were easy to follow, and the result was spectacular. I used Greek yogurt instead of cream for a lighter option, and it paired beautifully with the sweet meringue.
I used all the suggested fruits, and the colours alone made me smile.
“Light, airy, and absolutely delicious! The mint leaves added such a refreshing finish, and the honey coulis was the perfect final touch.
The meringue was delicate yet sturdy enough to hold the cream and fruit without collapsing. I’ll be making these for Christmas with red and green fruits for a festive touch.
Comments are closed.